License Product
Let say that we want to sell a license product, like a game or a software. We want to sell it for 10€ and we want to give it to the customer as soon as he paid for it. We would also like that each customer gets a different license key for the product he bought. So let's see how we can do that with ShopBot.
The product
Before creating the product on the dashboard, let's prepare our license keys. For a license product, you will need a list of unique license keys that will be delivered to your customers after purchase. Prepare a text file (or spreadsheet) with all your license keys, one per line. You will need to enter them into ShopBot so that each customer receives a unique key upon purchase.
Creating the product
First, go to the Dashboard and click on the side bar, then on Create a Product. In our case, the product will be a license key that will be sent to the buyer as soon as they pay for it. Choose Text Product as the product type.
First step
Lets Setup the basic product information. Here are the things that I will fill in for my product, you can of course customize it as you want.
- Product Name :
Awesome Software License Key - Product Description :
Get your unique license key for Awesome Software and unlock all its features! Perfect for personal and professional use. - Product Embed Color :
#FF5733(A vibrant orange color to make it stand out) - Product Thumbnail : (A small image representing the product, e.g., a logo or icon)
- Product Image : (An optional larger image showcasing the product)
- Product Stock :
Unlimited(This will be controlled by the last step of our product creation) - Purchase Limit :
Unlimited(Each customer can buy an unlimited amount of license keys) - Product Variants :
Unique(No variants for this product)
As you can see I've set a custom Product Embed Color, it will make my product stand out a bit more than the others. I've also set a Product Thumbnail to better illustrate my product.
Second step - Payment Information
Here, we will need to put our product payment information to be able to be paid each time somone buys our product. In our case, I will select Stripe as a payment provider and I will put my Stripe account id in the Platform ID input. If you don't know how to get your Stripe account id, please check this guide. Then I will put my product price and currency. You can use any payment provider, it's really up to you !
Here are a few notes about the different payment providers and their PlatformID :
Payment Provider / ShopBot
For ShopBot you will need to select the server that the product will be linked to. And that's all ! The currency will be STKN (ShopBot Token) and the price will be the amount of tokens that you want to sell your product for.
Payment Provider / Paypal
For Paypal, you only need to put your VALID Paypal email address that is linked to your account. If you populate a wrong email, no one will be able to have a checkout link.
(Once your product is created and generated, I strongly recommand that you click on "buy" on your product to see if a checkout link is created. If not, modify your product Paypal email address in Products -> Product List -> Select your product and click on "edit" -> Payment Information -> Platform ID)
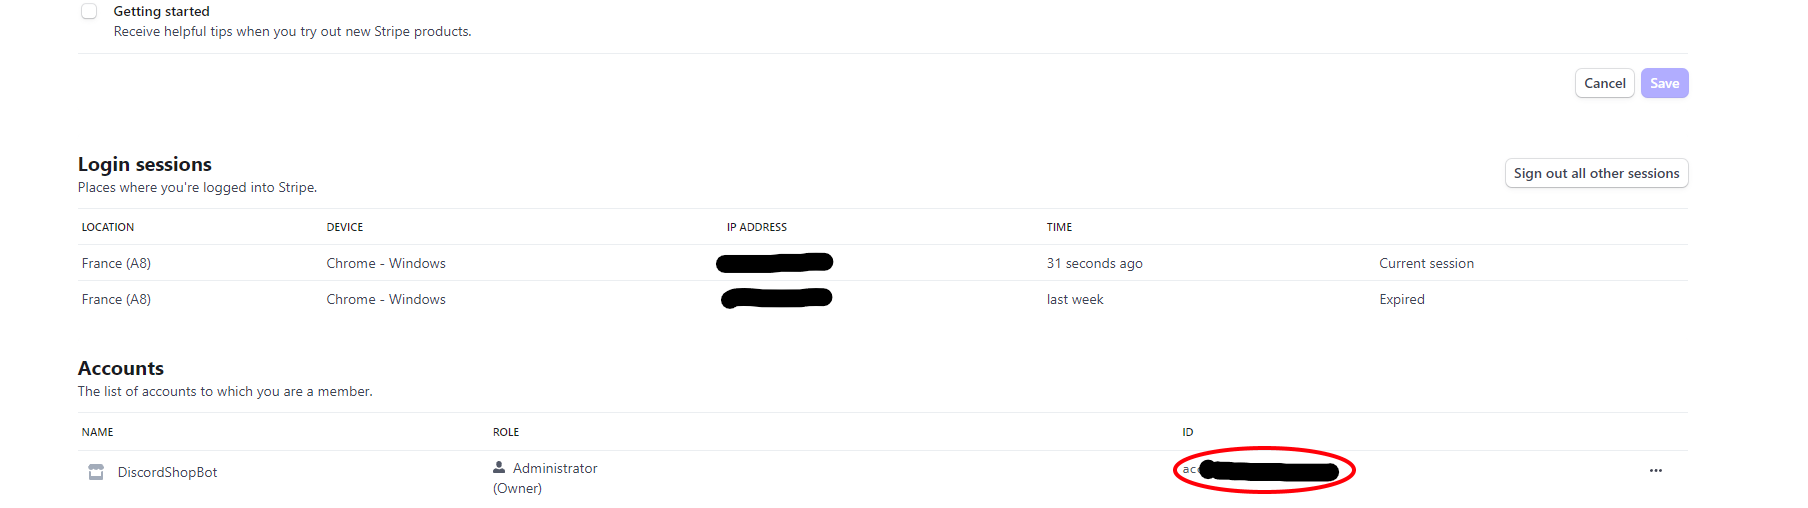
Payment Provider / Stripe
For Stripe, it is a bit harder but it is worth it! You need to have a stripe connected account . Once you have that, then head to your profile here, go to the bottom of that page and copy your account id (see image below) and paste it in the platformID input.
Price / Currency
Now, you need to put your product price and currency. I recommend you to choose your currency first. Note that if you choose Paypal as a platform, the minimum price is 7.5€ (or equivalent in other currencies) for a product. Whereas for Stripe, it is 2.5€ and you will have LESS fees applied to your payment.
Step Four - Product Automatic Actions
You can activate or deactivate the automatic actions you want. If you don't know what they are, please check this doc. In Our case we will just put a Success Message to thank the customer for his purchase. Here is what I will put in my success message:
Thank you for purchasing the Awesome Software License Key! Your unique license key will be sent to you shortly. If you have any questions or need assistance, feel free to contact our support team.
That's it for this step!
Step Five - The Product Itself
Now comes the most important part of our product creation: the license keys list. In the Product Content section, select Mutiple as the Delivery type. This will allow us to deliver a unique license key to each customer.
In the content box, add an entry for each license key you prepared earlier.
And Done ! Your product is ready to be sold.
After accepting the rules and conditions, click on Submit and your license product will be created!
Second Step - Generating the product to our server
Step One - The Product ID
Now that our product is created, we need to generate it to our server. To do that, we will go to the Dashboard and we will click on Product in the side bar. Then we will click on Product List and we will copy the Product ID of our created product.
Step Two - Generating The Product
Now let's head to our server and let's type /generateproduct <Product ID> in a channel. If you don't know how to get your product id, please check the previous step. If you did everything correctly, you should see a discord embed representing your product.
And now you are done! Each time a customer purchases your product, they will automatically receive a unique license key from your list. If you want to edit your product or update the license key list, you can do so at any time on the dashboard by clicking on Products in the side bar, then on Product List, and then on Edit for the product you want to update.
The stock of your product is automatically managed by ShopBot. Each time a customer buys a license key, it is removed from the available keys list. So keep an eye on your stock if you have a limited amount of license keys to sell!