# Premium Role Subscription
Let say that we want to offer a premium role subscription to our users. We want to give them the ability to subscribe to a premium role for a certain amount of time. If the user is subscribed to the premium role, he will have access to some premium features like an access to a channel with other premium users, a private channel where he will be able to host his files (I am taking the example of a server who has a bigger limit to file hosting, so it's interesting for the user) and he will be directly supporting the discord server. If the subscription expires, the user will lose access to the premium role.
# The product
Before creating the product on the dashboard, let's create it, in our case I will create a premium role that I will name Premium. I will also create a category where all the private channels will be created and a channel where all the premium users will be able to chat together.
# Creating the product
Once that's done,lets go on the Dashboard (opens new window) and let's click on the side bar, then on Create a Product. In our case the product will be a premium role that will be added to the buyer as soon as he paid for it. So we will choose Discord Product as the product type. Then we will give it a name, a description and a price.
# First step
Lets Setup the basic product information. Here is a table that will help you to fill the form.
😎 Stands for not required, so do it only if you want it. ⚠️ Stands for required, so please fill it correctly or you will not be able to pass to the next step !
| Option Name | Description |
|---|---|
| Product Name ⚠️ | It will be you product name. It will be displayed as the title of your product on the checkout and on the product embed |
| Product Description ⚠️ | It will be your product description, it will be set as a description in your product embed |
| Product Color 😎 | This s a hex code for the color want want your product embed to have. It is only avalable to ShopBot Plus and Premium users. If you don't put anything, the color will be green by default. |
| Product Stock 😎 | If set to Limited, this will limit the number of products that your customers can buy, you can add more stock whenever you want by editing the product after its creation. If there is no more stock, your customers won't be able to purchase your product. |
| Purchase Limit | If set to Limited, this will limit the number of products that your customers can buy for a lifetime. If for example your product can only be bought once, then set the limit to 1 |
| Product Image 😎 | It will be your product main image, it will be set as the image of your product embed. BUT if you want to put an image it MUST be a link to an image or it will be rejected by Discord (ex: https://shopbot.site/images/ShopBot-big-logo.png ) you CAN use link shorters ! |
| Product Thumbnail 😎 | It will be your product thumbnail, it will be displayed as the thumbnail of your product on the product embed. BUT if you want to put an image it MUST be a link to an image or it will be rejected by Discord (ex: https://shopbot.site/images/ShopBot-big-logo.png ) you CAN use link shorters ! |
Here is my filled form:
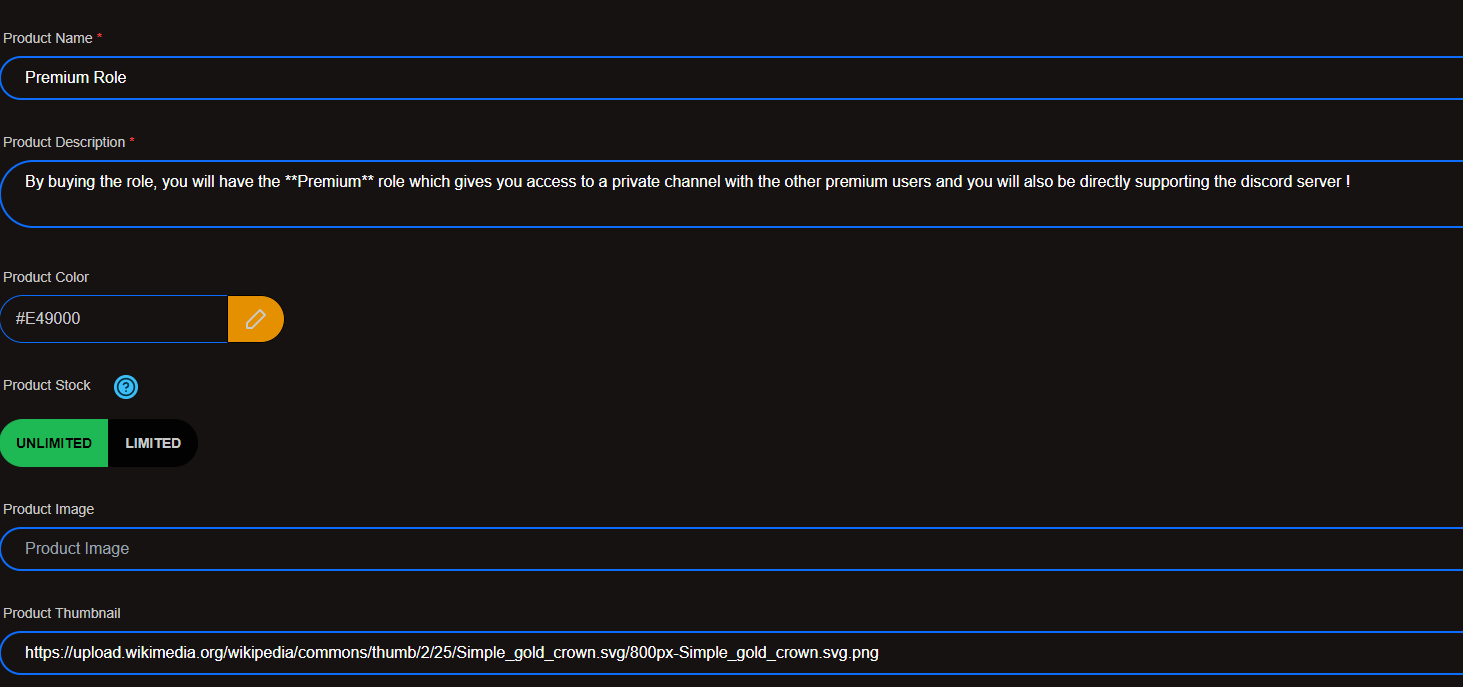
As you can see I've set a custom Product Color, it will make my product stand out a bit more than the others and also reflects the Premium role color. I've also set a Product Thumbnail that is a pic of a drawed crown to better illustrate my product. I didn't put any Product Image because I don't want to put too much information on my product embed. I've also set the Product Stock to Unlimied beacuse I want to sell an unlimited amount of roles !
# Second step - Payment Information
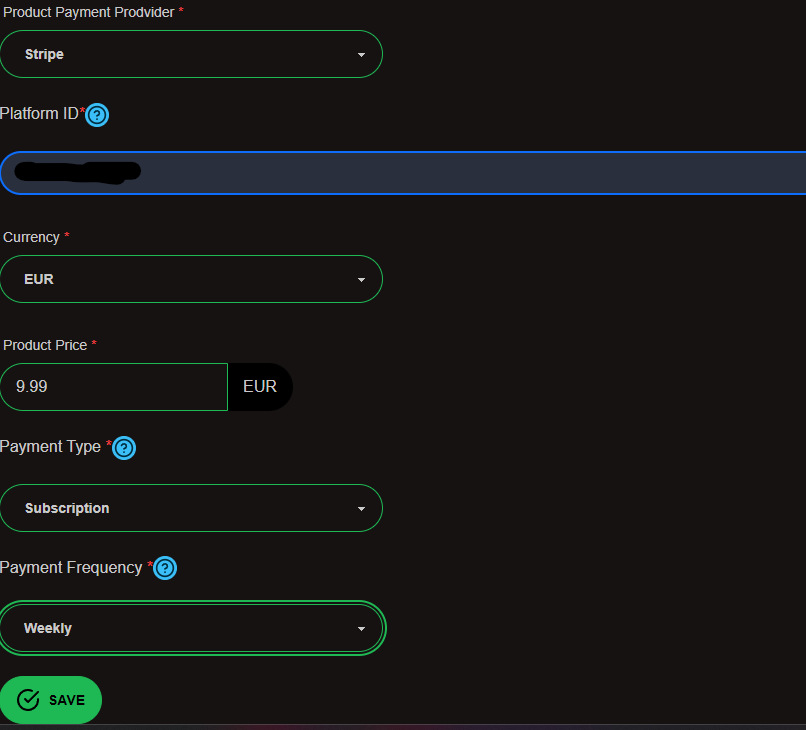
Here, we will need to put our product payment information to be able to be paid each time somone buys our product. In our case, I will select Stripe as a payment provider and I will put my Stripe account id in the PlatformID input. If you don't know how to get your Stripe account id, please check this page. Then I will put my product price and currency.
Here is some help with the other platforms:
# Payment Provider / ShopBot
For ShopBot you will need to select the server that the product will be linked to. And that's all ! The currency will be STKN (ShopBot Token) and the price will be the amount of tokens that you want to sell your product for.
# Payment Provider / PlatformID - Paypal
For Paypal, you only need to put your VALID Paypal email address that is linked to your account. If you populate a wrong email, no one will be able to have a checkout link.
(Once your product is created and generated, I strongly recommand that you click on "buy" on your product to see if a checkout link is created. If not, modify your product Paypal email address in Products -> Product List -> Select your product and click on "edit" -> Sensible Informations -> PlatofromID)
# Payment Provider / PlatformID - Stripe
For Stripe, it is a bit harder but it is worth it!
You need to have a stripe connected account . Once you have that, then head to your profile here (opens new window), go to the bottom of that page and copy your account id (see image below) and paste it in the platformID input.

# Price / Currency
Now, you need to put your product price and currency. I recommend you to choose your currency first. Note that if you choose Paypal as a platform, the minimum price is 7.5€ (or equivalent in other currencies) for a product. Whereas for Stripe, it is 2.5€ and you will have LESS fees applied to your payment.
# Payment Type
Because we want our product to be a subscription, we will select Subscription as a payment type, we will select Weekly as a payment frequency so it means that the price that we have entered is for 1 week of susbcritpion. But if you want your product to be a one time payment, you can select One Time.
Here is my filled form:
# Step Four - Product Automatic Actions
You can activate or deactivate the automatic actions you want. If you don't know what they are, please check this page.
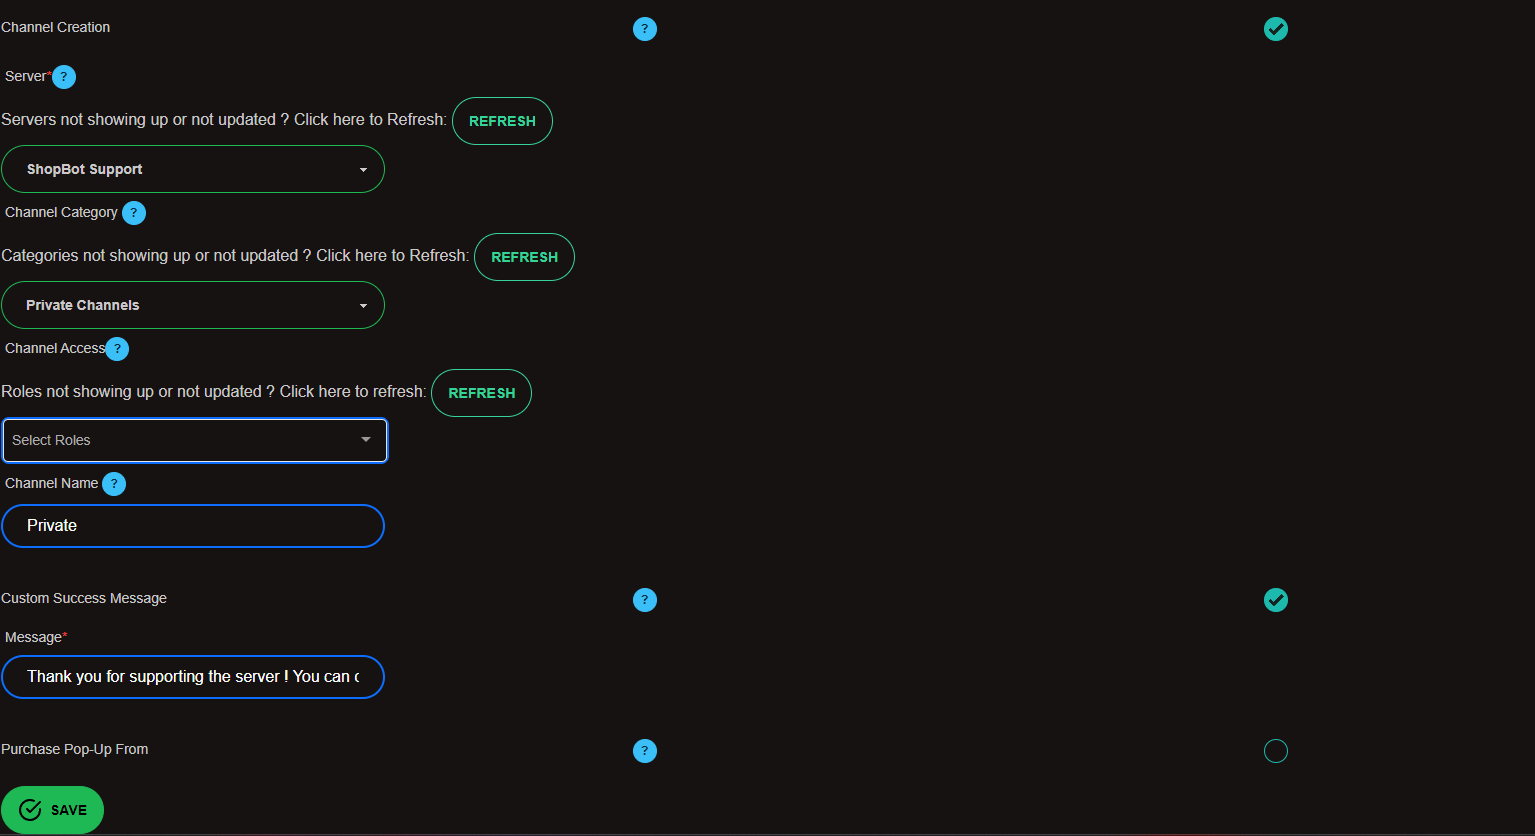
In our case we need the Channel Creation automatic action. Because we want to create a private channel for each user that buys our product. So we will activate it and we will select the server in which we are selling our product and the category where we want the channels to be created. We will also select the roels that will have access to the created private channels, in our case, because we want this channel to be private we will not select any roles, so only the buyer and of course, admins will have access to the channel.
For the Channel Name we will enter Private, and ShopBot will automatically add an ID at the end of the channel name. So if the ID is 1, the channel name will be Private-1.
And beacuse this is also a support to the server we want to thank the user so we will activate the Custom Success Message automatic action. In this message I will thank the user for his support and informa him that he can contact us if he has any questions.
Here is my filled form:
# Step Five - The Product Itself
Now we can select which roles are going to be given to the buyer.
The Server selector is the server that you want to sell the role from it should be the same as the one that you have selected for the channel automatic action. If you don't see your server in the list even after a refresh, thats mean that you didn't added Shopbot to your server. If you see a text saying that you have already selected a server, that means that you have already selected a server for the automatic action or an other step above.
Once that your server is selected, you will need to choose up to 5 roles that you want to sell on your server in the role selector.
WARNING
⚠️
All the role that you are selected MUST be UNDER the ShopBot role or it will not work (See animation bellow)
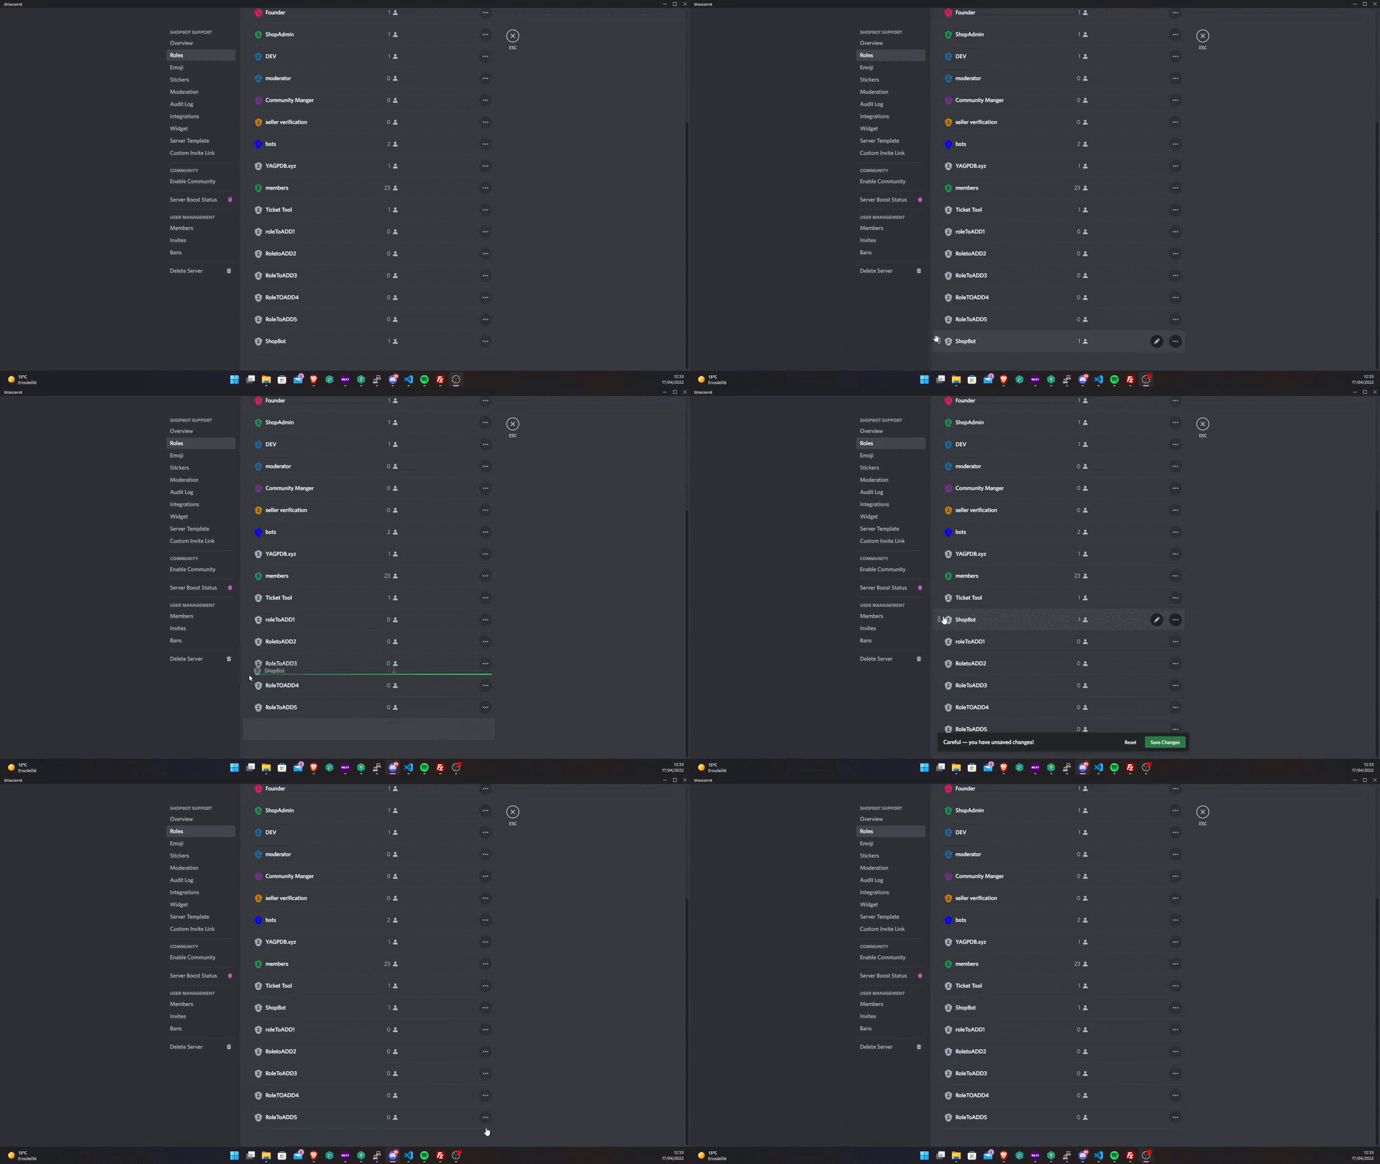
(Here We want to put the ShopBot role higher than the role we want to add (here Role 1 ;2 ;3 ;4 ;5))
In our case we will select the Premium role.
Here is my filled form:
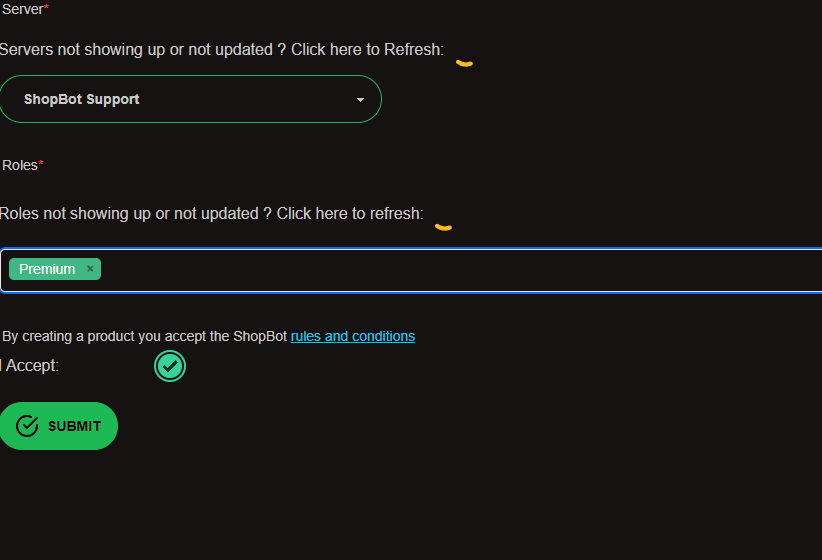
After accepting the rules and conditions, we can click on Submit and our product will be created !
# Second Step - Generating the product to our server
# Step One - The Product ID
Now that our product is created, we need to generate it to our server. To do that, we will go to the Dashboard (opens new window) and we will click on Product in the side bar. Then we will click on Product List and we will copy the Product ID of our created product.
# Step Two - Generating The Product
Now let's head to our server and let's type /generateproduct <Product ID> in a channel. If you don't know how to get your product id, please check the previous step. If you did everything correctly, you should see something like this:
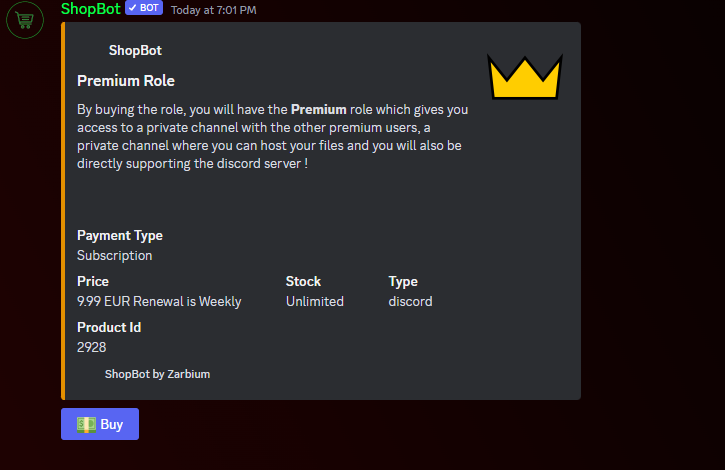
And now we are done ! You can now click on the link to see how your product looks like ! If you want to edit your product, you can do it any time on the dashboard by clicnking on Products in the side bar and then on Product List and then on Edit on the product you want to edit.