# Create Normal Product
In this section, you will learn how to create a normal product. It is very easy and quick ! From here we will assume that you've already correctly setup your server. If not, check this page.
A normal product is a text that will be sent to the buyer, for example, it can be an image link, downloaded link or any text you want more product type are coming !!!
# Step One - Go on the Dashboard
First thing, you need to go on the ShopBot dashboard (opens new window). You will need to connect with your Discord account.
Then go to Products -> Create a Product.
Here, you will need to choose your product type. You then need to select a normal product.
# Setp Two - Product Informations
😎 Stands for not required, so do it only if you want it. ⚠️ Stands for required, so please fill it correctly or you will not be able to pass to the next step !
| Option Name | Description |
|---|---|
| Product Name ⚠️ | It will be you product name. It will be displayed as the title of your product on the checkout and on the product embed |
| Product Description ⚠️ | It will be your product description, it will be set as a description in your product embed |
| Product Color 😎 | This s a hex code for the color want want your product embed to have. It is only avalable to ShopBot Plus and Premium users. If you don't put anything, the color will be green by default. |
| Product Stock 😎 | If set to Limited, this will limit the number of products that your customers can buy, you can add more stock whenever you want by editing the product after its creation. If there is no more stock, your customers won't be able to purchase your product. |
| Purchase Limit | If set to Limited, this will limit the number of products that your customers can buy for a lifetime. If for example your product can only be bought once, then set the limit to 1 |
| Product Image 😎 | It will be your product main image, it will be set as the image of your product embed. BUT if you want to put an image it MUST be a link to an image or it will be rejected by Discord (ex: https://shopbot.site/images/ShopBot-big-logo.png ) you CAN use link shorters ! |
| Product Thumbnail 😎 | It will be your product thumbnail, it will be displayed as the thumbnail of your product on the product embed. BUT if you want to put an image it MUST be a link to an image or it will be rejected by Discord (ex: https://shopbot.site/images/ShopBot-big-logo.png ) you CAN use link shorters ! |
# Setp Three - Payment Information
Here, you will need to put your product payment information to be able to be paid each time somone buys your product. Your platformID depends on the choice you make through the payment provider dropdown. (you don't need a platformid for ShopBot as a payment provider)
# Payment Provider / ShopBot
For ShopBot you will need to select the server that the product will be linked to. And that's all !
# Payment Provider / PlatformID - Paypal
For Paypal, you only need to put your VALID Paypal email address that is linked to your account. If you populate a wrong email, no one will be able to have a checkout link.
(Once your product is created and generated, I strongly recommand that you click on "buy" on your product to see if a checkout link is created. If not, modify your product Paypal email address in Products -> Product List -> Select your product and click on "edit" -> Sensible Informations -> PlatofromID)
# Payment Provider / PlatformID - Stripe
For Stripe, it is a bit harder but it is worth it!
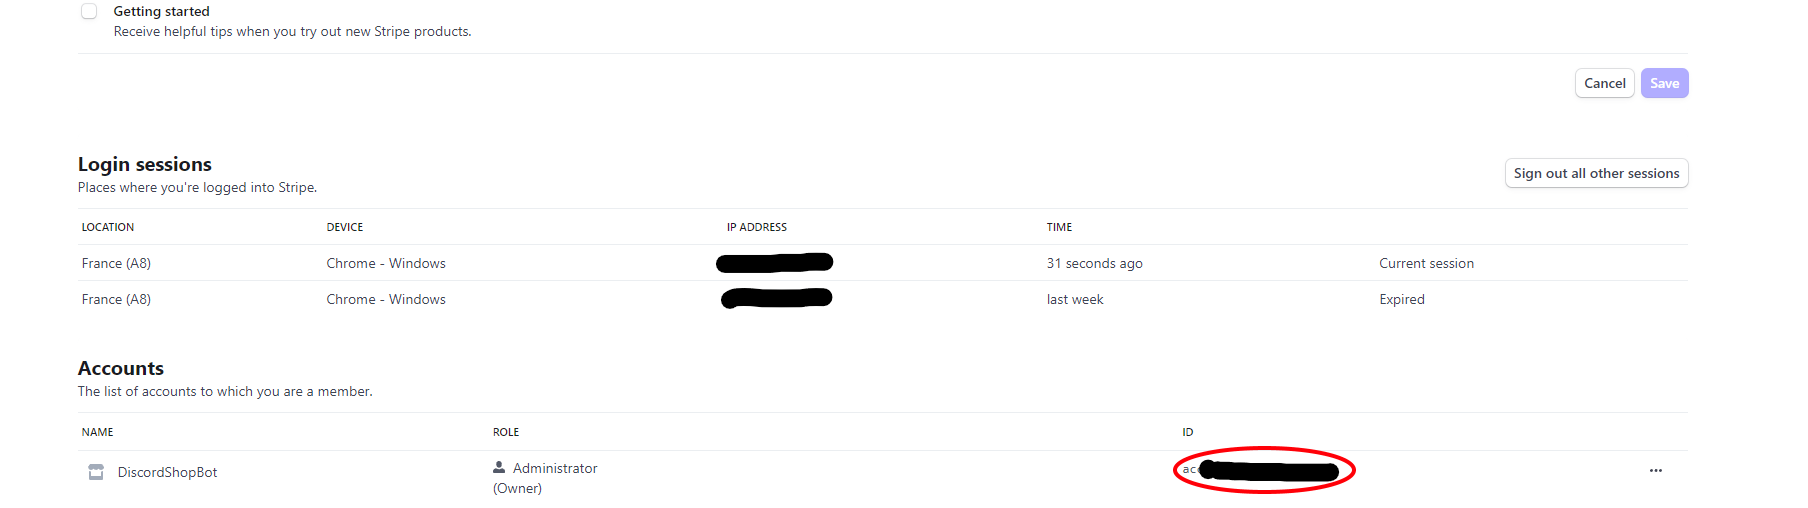
You need to have a stripe connected account . Once you have that, then head to your profile here (opens new window), go to the bottom of that page and copy your account id (see image below) and paste it in the platformID input.
# Price / Currency
Now, you need to put your product price and currency. I recommend you to choose your currency first. Note that if you choose Paypal as a platform, the minimum price is 7.5€ (or equivalent in other currencies) for a product. Whereas for Stripe, it is 5€ and you will have LESS fees applied to your payment.
# Step Four - Product Automatic Actions
You can activate or deactivate the automatic actions you want. If you don't know what they are, please check this page.
# Step Five
One more step and you are DONE !
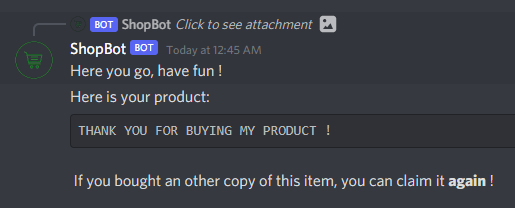
The Product input is the text that will be sent to your buyer when he claims your product (see image bellow).
Here I have put "THANK YOU FOR BUYING MY PRODUCT !" as a product text.
Once you have submited your product you ARE DONE ! Now let's generate it on your Discord server !
# Generate your Product
First, you need to have your product ID, to find it, go on Products -> Product List and you should see your products and it's ID right under its image (if you dont see it simply refresh the product list by clicking the refresh button)
Once you have your product ID, go on your Discord server and go in the channel where you want the product embed to be generated.
Then type /generateproduct YOUR-PRODUCTID I think that you guessed that you need to put your product ID instead of YOUR-PRODUCTID. Hit enter and let the magic happen, if everything is correct, your product embed should be created. You can delete the first information message that says Product Created ! If you want to modify your product got on the shopbot dashboard and regenerate your product embed again !.
If you modify your product you will obviously need to recreate and follow the same procedure.
And you have finished ! From now on, you don't have anything to do, the product is fully working.
# Quick Fixs
here is a list of known issues and a way to fix it
| ❌ Issue | ✅ Fix |
|---|---|
| Only seeing a Buy Button | This issue is caused by the embeds being disabled on your server, please activate this option in your server settings |
| Need a ShopAdmin Role | You did not correctly setup your server please see this page |
| I do not own the product I want to generate | Only the person who created the product on the dashboard can generate it |